
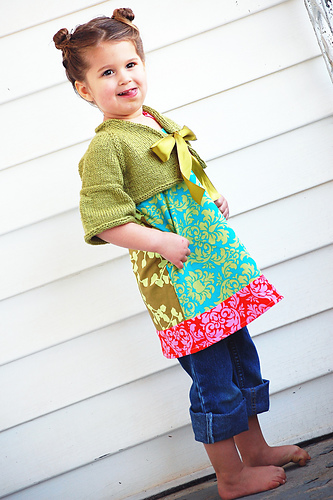
04.03.09 Okay, here's the revised version. Don't know if it was a communication or measuring error, but my niece's chest is only 22 inches, not 32. Slight difference there! :-) And we tried this one on Sophie's older 5 year old sister, and it fit her, too, in the shoulders and body, just not the length. I actually liked it better on Evi, since it was a little more snug (in a good way) in the body. I made the front panels on Sophie's wider than they should have been, but I have corrected the numbers for it below, so it should work fine for you now.
I'm finishing up a slightly smaller one for Sophie's younger sister, and I used a sz. 6 needle and slightly thinner yarn (Plymouth Jeannee worsted weight). I'll measure the gauge and report on that soon, along with difference in stitch numbers for Mileigh's size. Anyone on Ravelry, the unfinished project is in my projects, Rav name "hollisann."
Late Feb.... Apparently, 32 in. is the chest size for a 12 year old. So, until I do my second one to test what I wrote, know that the pattern is VERY new, very raw, and very possibly wrong. :-) If you're familiar with top-down raglan construction, knit away, checking the sizing on the child as you go. Stop when it fits. (At least in theory.)
This is a sweater I made for a contest at Loops, a knitting store, in Tulsa. It was a contest to showcase Louisa Harding yarns, judged by Louisa herself. We're still anxiously awaiting the results. In the meantime, I'm getting busy with a second one so that at least two of my 4 nieces will have sweaters to match their Easter dresses, also made by Aunt Holly. The older two may be outta luck on the sweater half. When's Easter??? A sweater for a 1 year old is sooo much faster than for a 7 year old. :-)

Okay, let me say from the start that this is most definitely, absoLUTEly an unproven pattern so far. It's a typed out version of my cryptic notes as I knit this up. So, this weekend, I'll embark on a second knitting of the same sweater for another niece, and I'll watch the pattern as I go to look for errors. If anyone knits it before my corrections, please, oh please, let me know what you catch so I can fix it asap.
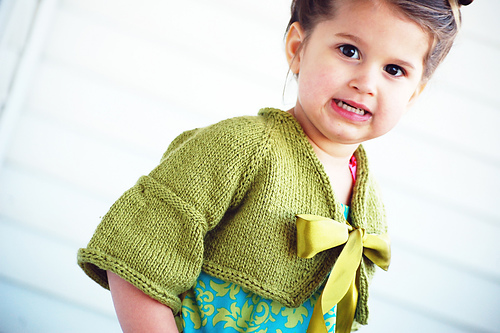
Sophie's Shrug (erratas corrected --we hope-- as of 04.03.09)
Yarn: Louisa Harding Kashmir (aran weight), 4 balls (I just found #5 unused in my knitting bag. Hopefully you can return one if you already bought 5.)
Ribbon: 2” double-faced satin; would also look cute with I-cord
Needles: US 7 needles, circular (24” or longer) and dpn (optional) for sleeves, US 4 circs or dpns for sleeve detail.
Gauge: 4.75 st/in and 7.5 rows/in
Size: fits 4 yo with 22in. chest.
Terms:
CO cast on
BO bind off
k knit
p purl
ws wrong side
rs right side
pm place marker
sm slip marker to right needle
m1l make one left (pick up bar between stitches w/ left needle through front, knit in back of loop, twisting stitch.)
m1r make one right (pick up bar between stitches w/ left needle through back, knit in front of loop, twisting stitch.)
ssk slip 2 stitches knitwise onto right needle, pass both back to left needle, knit both together as one through back loops.
k2tog knit two stitches together as one.
Applied I-cord: CO 4 stitches, (pick up one stitch along edge of sweater, k 3, skp) repeat all the way around edge, grafting ends together. *this does leave a little bump at the grafted edge because of the CO. The next sweater I make, I'm going to play with provisional cast-ons so that the grafting is more seamless. If anyone tries it, let me know how it turns out.
**This applied I-cord is different than the ones I've seen online or in patterns. I'm sure I'm not the first to do it, so if anyone has seen it before, please let me know. It'll spare me a tutorial and give credit where credit is due. In essence, this version goes around the edge instead of just in front of it. I agonized over different ways to do the I-cord on a steeked edge once until I discovered this version, capturing all those potentially rough edges inside the i-cord.
Directions:
Setup
CO 26, using long-tail CO or other somewhat stretchy cast-on.
Setup row: k2, pm, k4, pm, k14, pm, k4, pm, k2.
Increase rows:
Row 1 (wrong side): k1, p to last stitch, k1.
Row 2 (right side): k2, m1l, (k to m, m1l, sm, m1r) 4 times, k to 2 before end, m1r, k2. (For the second one, I did m1l on either side of each stitch marker. It made an eyelet along the raglan line. The original one will make a closed hole-less raglan line.)
Repeat increase rows 3 times, then work the rows 6 times more, increasing the neckline edges every other right side row. Continue raglan/sleeve increases as you have been.
Underarm setup:
k2, Ssk, [k to stitch before first marker of sleeve, place sleeve stitches (including your increase stitches on either side of the sleeve) onto waste yarn for later. CO 3 stitches] 2 times, k to 3 st before end, k2 tog, k1.
Decrease rows:
Row 1 (wrong side): k1, p to 1 before end, k1.
Row 2 (right side): k1, ssk, k to 3 before end, k2tog, k1.
Row 3 (wrong side): k1, p to 1 before end, k1.
Row 4 (right side): knit.
Repeat decrease rows 1-4 three times, then repeat rows 1 and 2 three more times.
(IF you want the shrug to be longer, here is where you can customize and make it longer by doing a decrease every OTHER right side row instead, and by doing 20 decrease row repeats instead of 10. Or average them out by decreasing on repeats 1, 2, 4, 5, 7, 8, etc, or whatever works with the length you'd like to end up with. You basically just want to keep some type of a curve going along the edge as you work toward your desired length. So scientific, aren't I?) You also don't want the front number of stitches to be much more than the back number of stitches unless you're making a larger one for a girl with a fuller figure. You don't want the bust area to be too roomy compared to the back.
Bottom edge:
When you have your desired length, end on a right side row, ready to start a wrong side row. Bind off while you: K1, p to 1 before end, k1
Sleeves:
Place sleeve stitches back onto your needles (either dpns or long circular for Magic Loop) so that you'll be starting in the underarm area. Pick up 3 stitches in the cast on stitches of the body, then work evenly, knitting in the round for 10 rows, then purl with smaller needle for 4 rows. Switch back to larger needles and knit, increasing (m1r) 6 stitches evenly over sleeve in first row.
K evenly for 5 rows.
Increase 6 stitches evenly over sleeve and knit to desired length. (I knit for another 16 rows, or approx. 2 more inches.) When you reach your desired length (the model is aprox. ¾ length) BO while purling last row.
Repeat with second sleeve.
Applied I-Cord trim:
Beginning in inconspicuous area, begin your applied I-cord around the bottom of the body, up around one front side, around the collar, down the other front side, and across the bottom to where you began. Graft I-cord together and finish off yarn.
Do the same with each sleeve.
Handsew ribbon to the center of each front side, and voila! You're done!
Steam or wet block, and enjoy!
5 comments:
love this shrug and love the model and love the photos!
I am in the process of knitting your shrug. Please post the pattern corrections. Thanks
Debbie,
Corrections to come sometime tomorrow. Sorry! Life's been crazy here lately.
Debbie, corrections are made and fingers are crossed. :-) I don't see a way in your profile to contact you other than here. Sorry I couldn't email you as soon as I fixed it!
Thanks for posting the corrections. I was working the increase rows, so I will just start over. I think I would rather do that than have one much larger than I needed. Thanks again. Debbie
Post a Comment